Gauge: Note that this design is super-stretchy, and should fit most adults even with some variation in stitch gauge.
Stitch gauge: 5.7 st/in in stockinette
Row gauge: not important.
Yarn weight: Sport
Needle size: US 3
Abbreviations:
K - knit
P - purl
M1 - make 1, create a new stitch by putting the left needle under the yarn between two stitches, lifting up, and then knitting or purling it through the back loop.
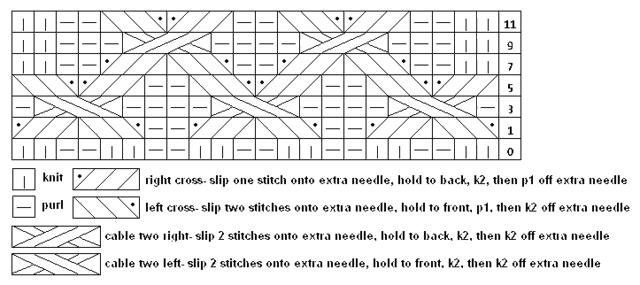
Cable chart:

Instructions (Right mitt):
1. Cast on 48 stitches, and join, being careful not to twist. Arrange on dpns with 24 stitches on needle 1, 12 each on needles 2 and 3. If knitting on two circulars or using magic loop, arrange with 24 stitches on each side.
2. Work in K2, P2 ribbing for 2 1/4 inches.
3. Begin patterning and thumb gusset:
Round 1: Work first row of cable chart across first 22 stitches, P2, M1 (purl), K2, M1(purl), continue in pattern to end of round.
Round 2: (and all even rounds): Knit the knit stitches and purl the purl stitches.
Continue knitting, following the pattern chart on the back of the hand increasing 1 stitch on each side of the thumb gusset every fourth row, maintaining the rib pattern. Use stitch markers if desired to mark the beginning and end of the gusset. (Note there will be two knit stitches- one rib- in between the first two increases...the gusset will be centered on that rib.)
Therefore, the increase rounds will look like:
Round 5. Work the fifth row of the pattern chart, P2, M1 (purl), P1, K2, P1 , M1(purl), continue in pattern to end of round.
Round 9. Work the ninth row of the pattern chart, P2, M1 (knit), P2, K2, P2, M1(knit), continue in pattern to end of round.
Round 13. Work the first row of the pattern chart, P2, M1 (knit), K1, P2, K2, P2, K1, M1(knit), continue in pattern to end of round.
Knit 2 1/2 repeats of the cable chart, ending on row 5 (Round 29)
Increase until there are 18 stitches in the thumb gusset (Round 29)
Knit one more round, knitting the knit stitches and purling the purl stitches.
4. Knitting the thumb cuff:
There there are two ways to go- put everything except the gusset stitches on stitch holders and work the thumb on four needles. Or do what I did (because I didn't have stitch holders with me) and put all the hand stitches on two of the needles and knit the thumb flat on the remaining two.
Method 1 (in the round): Distribute the gusset stitches on three needles, cast on two stitches across the gap. Knit 8 rounds in K2,P2 rib (or to desired length) and cast off.
Method 2 (flat): Cast on 1 stitch at each end of the thumb gusset. Knit 8 rows (or to desired length), cast off and sew up the thumb.
5. Finish knitting the hand:
Redistribute your stitches back over three needles, join the yarn to the right of the gusset, pick up and knit two stitches across the thumb, and continue in K2 P2 ribbing for 2 1/4 more inches (or to desired length).
6. Cast off and weave in ends.
7. Left mitt: Work as for right except when you begin working the patterning and thumb gusset; work first row of cable chart across first 22 stitches, (K2, P2) four times (16 stitches), M1 (purl), K2, M1(purl), P2.

Oh, Thank you. I can't wait to start this one.
ReplyDeleteooh, oooh, ooooh! thank you for the pattern. me likey!
ReplyDeleteThis recipient is tickled. :)
ReplyDeleteFor the thumb, my favorite method is to do the thumb flat, as you did, then slipstitch it closed with a crochet hook, then continue with the hand part. This way, you don't cut the yarn, there are no ends to weave in.
ReplyDeleteI needed a pattern for my Dad and I think I have found it. Not Girly, Stretchy, and FUN. Thank you.
ReplyDelete