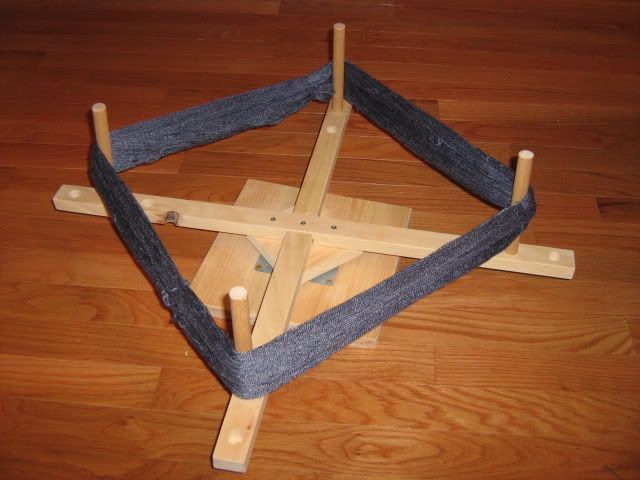
Yes, I have just built myself a yarn swift. It's something I haven't really minded not having. I wind occasional balls by hand without any fuss, and I don't get all that much yarn in skeins. But going from balls to skeins- that's a different story. See, one of the lots of free yarn I got a while back was a whole bagful- probably around 2400 yards of lovely cream sport-weight wool. And I thought 'Hmm. I don't really want to knit an all-cream sweater, but if I dyed some or all of it....'
And I poked around and looked at some dyes but I have enough other projects on my plate that dying the cream wool wasn't something I put any priority on. Enter my mother. My mother is an avid and marvelously skilled quilter, dyes some of her own fabric, and occasionally does workshops on dying. She's planning to have a dye-your-own day at her house and invited me to come and dye all that cream wool. And I said, 'Huzzah! Expert dying instruction.' And then I said, 'Oh, poot. Now I have to skein all that yarn.'
So I priced yarn swifts, and decided they were a little more than I wanted to spend for something that--however useful it would be on an ongoing basis--was really intended to facilitate one project. I considered a niddy noddy, which would have been even easier to build- but that's only really good for skeining, and if I'm going to have something like that lying around, I'd rather be able to wind from it too.
I looked online for people who had built their own, and found several very clever ideas, including people who had built swifts out of Lego and Tinker Toys. But alas, my Tinker Toys have been gone for 30 years. The most applicable plan I found was this one, done by a guy who has a heck of a lot more tools than I do. It's gorgeous. I figured that I could probably do something similar but simplify it a little- maybe substitute a square base for his elegantly crossed legs. But looking it over carefully, there was one aspect of the design I didn't care for--the way the armature is tensioned. It seemed to me that there could be some wobble in the arms. The arms basically turn on a single central bolt, which is tensioned using a washer, nut and wing-nut combination. What I really wanted was in that position was a bearing, the kind with top and bottom races, like a lazy susan. I have a little lazy susan for the kitchen, which I mainly use for frosting layer cakes, and I briefly contemplated sacrificing it for the cause. But it's plastic and I'd have had a better-than-even chance of ruining it and not getting a usable swift.
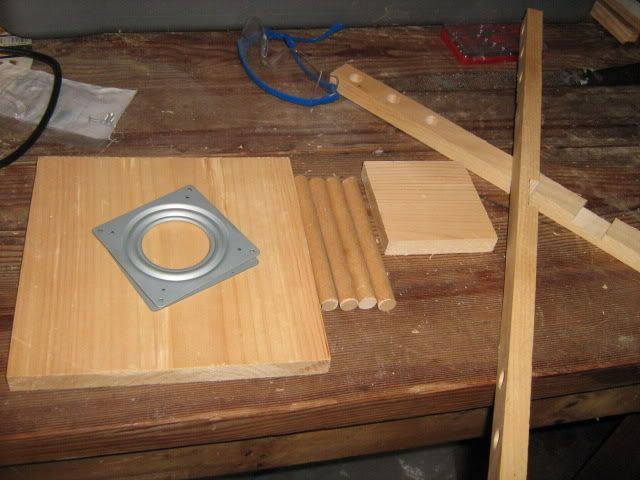
So I went back to the internet, and lo and behold, I found that you can get a four-inch lazy susan bearing at the hardware store (they stock it with cabinet hardware). Well. That simplified the whole design considerably. In fact, I think I could have made it even simpler by just mounting the top bearing plate to the arms and letting the whole thing spin on the bottom plate, but I wanted more stability, and something just a bit better looking. So I yanked some scrap out of the scrap lumber bin in the workshop and put this together in a couple of evenings. If I say so myself, it works extremely well. It spins quietly and easily on the bearing. For the speeds and loads this will see, it doesn't even need oil (the bearing is rated for something like 300 lbs). The price was right- less than $6 for the bearing and everything else I had on hand. Here's a photo of the pieces unassembled (you can click on either photo to enlarge them):

Components list:
wood base- 9" square by 3/4" thick
wood top - 4 1/4" square by 3/4" thick
1 4" four-inch lazy susan bearing
2 arms 26" long by 1 1/4 wide by 3/4" thick (1x2 or 1x1 would work fine)
4 pegs 5/8" diameter by 6" long
3 wood screws 1 1/2" long
8 wood screws 1/2" long
Tools:
drill
drill guide (optional- I found it useful for keeping the peg holes straight)
saw
clamps
router (for notching the arms together, this could also be done with a wood chisel)
screwdriver
sandpaper

Wow. Cool. Maybe if I show my family this post a hint will be taken. I do have a swift--one made of turquoise plastic, very cheap, and that snags and rips the yarn every time, so there weren't a lot of times before I put that hand-me-down away and permanently out of use.
ReplyDelete